Ogden Cami Hack

I love my Ogden Cami hack! This pattern is from True Bias and has now been released in a larger size range and the dart is included so if you don’t fancy trying to put your own in you’ve no need to worry. Inspired by one I saw on Instagram.

I felt much more confident hacking this pattern even though I was using silk, it sewed up like a dream. I would have preferred a better matched thread but in lock down I’d rather just use what I have.

Starting with the basic Ogden Cami pattern, I added bust darts, cut it shorter, to the lengthen shorten line. I doubled the length of the shoulder tie straps and cut four instead of two. I followed the true Bias instructions for the top but then went on to make a skirt to add.

I know this is going to sound really basic but then I just cut off two pieces of silk the width of my fabric to make the skirt. I used a basic pocket pattern piece from another pattern, I measured from the top of the rectangle to make sure they were in the same place and lined up but also check that they will be in the right place for you when you are wearing the top… something I forgot to do (oops) so my pockets are a bit low. I sewed one onto each end of each of the skirt pieces, see photos, I did a double row of stitching for extra strength and durability, then sewed the sides together sewing down the sides and around the pockets at the same time for inseam pockets.

Next I gathered the skirt, to gather I used a double row of basting stitch to reduce the skirt to be the same width as the bottom of the top piece, with right sides together pinning and sewing the skirt to the top, being careful to maintain the gather. (also don’t forget to put your stitch length back to normal) I also whizzed round on the over-locker, for extra strength and to stop the silk from fraying.

I hemmed it and voila! Finished.
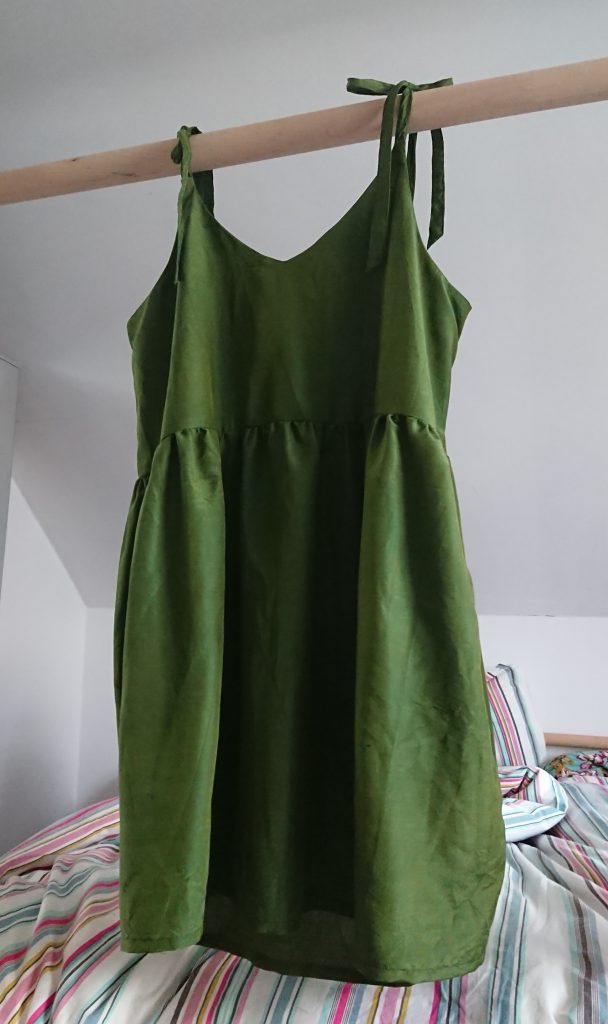
Gorgeous green Ogden Cami hack

Week 1: Me Made May

A personal challenge is to wear, photograph and document my makes as I head towards a handmade wardrobe. The documenting is going to be the hardest bit for me so please hold me accountable.

First top, GBSB

The first top I wore this month is also the first top I made, I don’t wear it often, as I hate the fabric, it feels clingy and I see all the mistakes in it but I do love that it has a bright contrasting zip and I learned so much by making and wearing it. I had the pattern in an older Great British Sewing Bee book, loads of great info through out the book

What I learned:

  1. I’ll not wear or buy satin again
  2. I don’t look bad in pink
  3. I like contrasting zips

I did go on to make a second top (Day 2) in the same pattern, since it was big enough to put on and off without using the zip I didn’t bother putting it in this time, I lowered the neck line and also made the bottom asymmetrical. instead of making a facing I also made a whole other top to make it reversible. Its silk so it feels lush!

Ogden Cami by True Bias

Day 3: I wore my 4th attempt at the Ogden Cami from True Bias, a gorgeous fabric from a fellow college student, you know back when we could be near each other. Unfortunately the course has been cancelled so I’m now learning from the internet, books and experience when I can get a moment.

I finally got round to leaning more about me this week which I will be sharing with you all another time.

Me Made May

Throughout May creatives will be posting and making their makes with the hashtag #memademay

Each week during May I will do a weekly round up of what I’ve been working on and what home made clothes I have worn, since I am a fairly new to sewing my own clothes I’ll have to work on some new ones or you may see me styling the same thing different ways.   I might also go back to my first tops (cringe) and show you how I started and just how far I have come in a short space of time.

Follow me on Instagram for almost daily updates. @gotstitch

My Sewing space… the table is made from an IKEA wardrobe door that I picked up in the bargain corner.


Martha, my dog showing you that the fabric colour matched her tongue.


Attempting to cut a pattern out with children and dogs around isn’t easy, when the fabric is a hideously slippery it makes it even harder.

Soft Toy Solution!

Soft toys are the bane of my life – I love them and hate them. The boys have a huge selection of them which have been accumulating at the foot of one of the beds. They frequently get thrown everywhere, not to mention having to clear them off every time I want to change the bed.

I needed a solution!

Pinterest to the rescue… I searched and searched finding a variety of soft toy storage ideas from boxes to pop up baskets. I considered a hammock slung under the bunk bed but then decided the chances of my boys not trying to climb in it were slim so back to Pinterest I went when I stumbled across Thread Riding Hood and her S.A.C (Stuffed Animal Cushion.)

Perfect!! I thought – but i didn’t want any more stuff on the floor either so I took that general idea and made a large bolster cushion of the foot of the bed instead.

This is how I did it:

Knowing how boisterous my little monkeys are I wanted to make sure it was very sturdy, so I used a heavy cotton and lined it with calico. The fabric I used for the outer is from Ikea, a cheap remnant that I picked up ages ago. I just had the calico in my hoard of fabrics, you can use whatever fabric you like really. If you don’t want to line it you don’t have too. The measurements are based on the one I made – you can adjust if you want. I have included a 1cm seam allowence.

You will need:

  • Scissors
  • Sewing machine (or needle and thread if you prefer to hand sew)
  • Suitable Thread
  • Outer Fabric
  • Lining Fabric
  • 90cm Velcro
  • A Sense of Adventure
  1. Cut 2 Circles from the Lining Material (diameter 35cm – circumference is 110cm*)
  2. Cut 2 Circles from the Outer Fabric.
  3. Cut 1 Large rectangle from the outer fabric – W92cm x L118cm
  4. Cut 1 Large rectangle from the Lining Material – W92cm x L118cm
    1. TIP – as its nearly square and I sewed it up wrong first time so to save you that hassle, put a marker pin on the 92cm length side so that you know not to sew that bit to the circle.

Start with the lining fabric:

  1. Pin the long edge of the rectangle around the circumference of the circle, sew round but leaving the overlap free of stitching for now.
  2. Repeat for the other end
  3. You should now have a basic bolster cushion with an open flap. Remove pins and tidy up edges – having boisterous boys I zig zag stitched over the edges to add strength.
  4. Repeat steps 6 to 8 with the Outer Fabric, with the pattered side facing in.
  5. Turn the Outer Fabric bolster pattern side out, put the lining fabric inside and line up the openings.
  6. If you prefer a zip, this is where you can insert the zip or if you prefer velcro carry on to add velcro.
  7. On one edge fold the outer fabric raw edge and lining fabric raw edges in, iron, pin and topstitch. Repeat for the other edge.
  8. Work out which one is top and which bottom, I put the scratchy side of the velcro on the top flap so it doesn’t scratch the kids if the velcro doesn’t line up perfectly. Pin and sew the velcro along the length of the openings.

Ta Da! You’re finished!

Now just fill it with toys.

* Actual circumference is 109.96 but I’m not that accurate!

Gecko Fun

An adventure in Gecko keeping.

I went to see a friend one weekend, and came home with baby Geckos. So far there care has been fairly straight forward… Mist with water, feed, watch and photograph. I am perfectly happy mixing up the paste but when it comes to live food I’m not great. I am really not a fan of crickets and my dear hubby has had to rescue me when a cricket decided to hop towards me.

Anyway, on to the cute bit.

Echo Reflection

Echo reflection as she clings to the glass.

Toeless

Getting ready to jump

Toeless

Perched on a finger

Echo

Look at the cute little toes!

Local Guide

I’m a Local Guide for Google Maps so I’ll be sharing some of my reviews with you. Its a great way to find new places if you are staying somewhere new.  I use the Explore section in Google Maps all the time and I started contributing as a result of that. I just thought  would share some of the places I have been.

Findern – a Wyevale garden centre

Cookes Pet Supplies

If there is somewhere you would like to see reviewed please let me know.

“Thank you for helping my sore paw” Martha


Wilde Creatures!

Wow, what 4 people can do on a stage!

As part of the season of Oscar Wilde this performance was a collection of his fairy tails pulled together in a musical performance. A throughly enjoyable, amusing, yet at times dark way to pull together a variety of stories. Thoroughly enjoyed by our 3 generations, this musical was well put together. I loved the way the props and scenery were integrated into a dynamic performance. The talented cast threw themselves into the various roles and played a variety of instruments along the way, drawing in the audience to help move the story along. An inspired and upbeat performance planting the seeds of success and opening the discussion of friendship, love and self worth. Clever and well paced engaging all ages.

DIY Decorations

My kids love crafts, and I quite like them too so finding something we can do together is always good. They also love christmas – I’m not such a fan but hey ho.

We have a christmas tradition that we have stolen from a great friends family.  Her mum bought her a christmas decoration each year, then when she moved out – she had her own unique set of decorations to get her started.  I thought it would be really nice to add a decoration that I had made for them and they could make some for my collection. I dislike salt dough, I just don’t like the smell or the feel of it so I searched for alternatives and came across this recipe that has been made by a few bloggers. I looked at about 10 with more or less the same recipe ( all cup measurements) I have adapted it to grams as thats what I like to use.

Anyway this clay would also be a great one for hand and feet prints for your little ones as its nice and soft and pliable and warm.  Aim to keep it a uniform thickness and allow it to dry slowly so avoid cracking but I will go into that shortly.

To Make it you will need:

  • 200g Bicarbonate of Soda
  • 100g Corn Starch
  • 150ml Water
  • Medium Saucepan
  • Spoon for Stirring
  • Cookie Cutters
  • Damp Tea Towel
  • Rolling Pin

Start by putting the Bicarbonate of soda, corn starch and water in the pan, put it on a medium heat and keep stirring. It will be quite liquid for a while but gradually thicken up – as it thickens turn the heat down but keep stirring.  When it gets to mashed potato consistency turn the heat off cover with damp tea towel.

Once cool enough get your hands in and have a feel, it should start to feel smooth and combined and be supple, give it a little kneed to soften it up.

Roll out the mixture, either between grease proof paper or I used corn flour to dust the surfaces.  Then cookie cutters to make the shapes you want.  I rolled it fairly thin, about 0.5cm thick, place them on a flat surface to dry out.  I also used a straw to cut holes in for the string to hang them with.  Once they have dried out a little you can add some decorations using a pencil or other pointy object.


When you are happy with them, cover with a slightly damp tea towel and leave to dry out. After a few hours I transferred them to a cooling rack but left them covered – thats to allow them to dry out evenly but slowly to stop the shapes drying too fast and cracking.

If you are doing hand/feel prints leave the dough a bit thicker but then really keep it drying out very slowly, re dampen the tea towel and when its hard enough transfer to a cooking rack, re-dampen the tea towel and leave it to dry slowly – this will take longer as its thicker.